To open select Custom Strategies from the main window’s
New Item Menu. This will open the Custom Strategies window. This is the main Custom Strategies window from which all spreads will be created, edited, and launched.
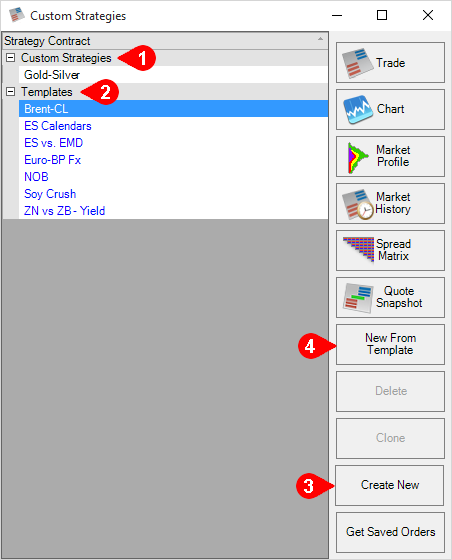
Within the Custom Strategies window there is a section for custom strategies (1) and a section for templates (2). The custom strategies section will list all user created strategies, while the templates section lists all templates provided with the software. Note that the composition and ratios of these templates are subject to change and they should be thoroughly analyzed before any orders are placed in them.
To start a new strategy from scratch, click Create New (3) on the right side. To build a strategy based on one of the existing templates, click the desired template followed by New From Template (4). Both of these buttons will open the Strategy Editor.
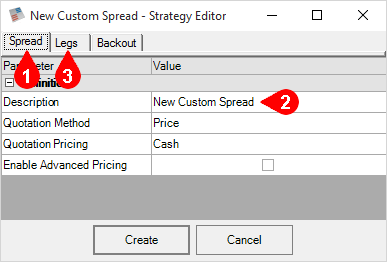
Within the Spread tab (1) of the Strategy Editor, give the new strategy a name in the Description box (2). Then click the Legs tab (3) to configure the legs of the strategy.
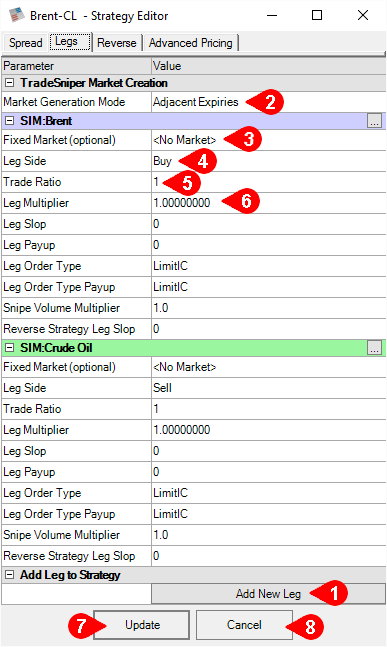
Click the Add New Leg button (1) to add the first leg of the strategy. Repeat this step until all legs have been added. If just two legs are chosen and both legs are of the same product, the Market Generation Mode (2) will need to be changed to Sequential Calendar Expiries, or the Fixed Market dropdowns (3) will need to be changed to specify the desired expirations for each leg. Next choose whether each leg is being bought or sold by changing the Leg Side dropdown (4). If you plan on executing orders through the Custom Strategies be sure to adjust the Trade Ratio (5) to reflect the number of contracts of each leg you would like to buy or sell for each 1 lot placed in the strategy. Changing this factor will not change how the price of the strategy is calculated. Instead, adjust the Leg Multiplier (6) to change the price calculation. For example, if a particular strategy is quoted by multiplying the first leg’s price by 2 and subtracting the second leg’s price as-is, the first leg would have a leg multiplier of 2 while the second leg would remain at 1. Once the parameters have been set, click the Create/Update button (7) to save the strategy or click the Cancel button (8) to return to the Custom Strategies window without saving.
When setting up your spread there are more options to better configure your spread for a more indepth break down of category's such as Leg Slop, Leg Payup, Leg Order type, Leg Order type, Snipe, Volume multiplier, and Reverse Strategy you can go to the
Strategy Editor-Legs Tab.
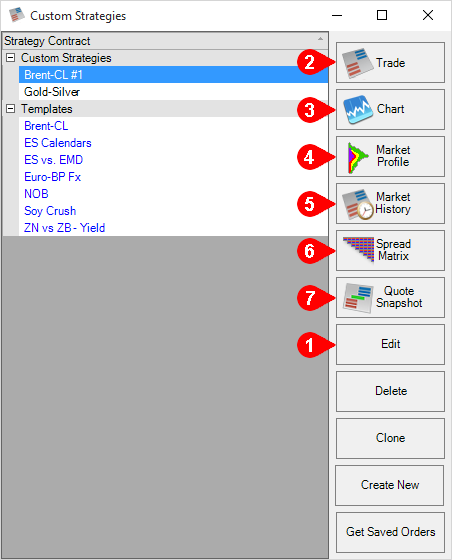
After a custom strategy has been created, it can be edited by selecting it and clicking the Edit button (1). To trade or see quotes for a strategy, select it from the Custom Strategies window then click the Trade/Quotes button (2). To open other windows for the selected strategy, click Chart (3), Market Profile (4), or Market History (5). The Spread Matrix (6) button will provide the option to open a spread matrix window for any of the legs of the selected strategy. The Quote Snapshot (7) will provide detailed information that breaks down the spread quotes into the constituent leg quotes and volumes for each depth level.
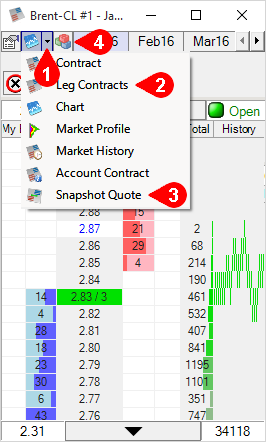
Within the contract window for a custom strategy, the dropdown menu (1) will contain three new features. Leg Contracts (2) will open additional contract windows for each of the legs of the strategy. Snapshot Quote (3) will open a new window that breaks down the spread quotes into the constituent leg quotes and volumes for each depth level. The Strategy Definition button (4) will open a view-only version of the Strategy Editor to display the complete strategy configuration at a glance.
Upon logging out of T4, if you have any orders working in the Custom Strategies you will be asked if you would like to save them for your next session. If you choose yes, the next time you login you will see the Saved Strategy Orders window on top of the other windows in your workspace. You can check any orders you would like to resubmit (1), then click the Submit Checked button (2) to put the orders back in the Custom Strategies or the Cancel button (3) to discard them. Any orders that would be filled instantly upon resubmitting will have a yellow background (4) behind the order type field. After either submitting or cancelling the orders they will be permanently removed from the server and will need to be manually resubmitted if desired after that point.


